Know that, when I fell to the ground and breathed my last in Midgard, I did not see my mother and my father as I was supposed to, nor did I see my sisters or my brothers. I did not see the line of my people stretching back to the beginning. I heard no call to join them in the halls of Valhalla. This was deeply troubling, as I began to feel I had somehow failed to prove my worth and would be cast down to Hel, waiting for my nails to be taken from my corpse to help build the Naglfar.
But such was not to be my fate. Mine was to enter someplace far stranger. Borne aloft by a Valkyrie, I was deposited among standing stones in a place which I now know to be called Valheim, a tenth world hidden away from sorcerer and skald alike, unknown to either jarl or karl. Or perhaps we heard wrong, too besotted on mead and hard of hearing from all the merrymaking and battle to realize that this was our final destination, an endless trial to forge the greatest of warriors through unrelenting survival. It was not simply battle against the Einherjar, but against a harsh and uncaring world and all that live within it, that will determine the true finale of our fates.
May the Allfather watch us and mark well our paths.
It’s safe to say that Valheim is not quite as punishing as some survival games like Rust, but that doesn’t mean it’s going to be a walk in the park either. There’s definitely a learning curve and the path to wisdom is ultimately going be a lot of trial and error. Fortunately, there’s dumb schmucks like myself who’ve bumbled along and picked up a few things along the way. I screwed up so you don’t have to.
And while there’s not a whole lot of opportunities for roleplaying your character yet (it is Early Access after all), it definitely helps to have a Viking mindset as you go through. This is your saga, to be written with battle, and sung in a hall of your construction. Best make it a good one.
The Arrival

After a short intro scroll and cinematic where you’re airdropped by a Valkyrie, you start off with a rag tunic, completely unarmed, and with a relatively low health bar. There’s also a chance it’s going to be raining, leaving you “Wet” (a status effect which hampers stamina regeneration, and important to keep an eye on). The raven Hugin is there to give you tips your first time around, so pay attention. He also gives you the overarching quest, to slay the various Forsaken creatures in the world.
Wood and Stone are the necessary components for your first tools. And the only way to get Wood (to start with) is by punching small beech saplings. You’re not going to get a lot of Wood doing this, but enough to give you your first tools. You’ll be able to make a club after downing a few saplings, a stone axe with about the same number plus a few Stones, and a hammer with maybe one or two saplings depending. The club and stone axe considerably better than your fists, and you’ll earn experience in those skills as you use them. For now, I would recommend using the club on enemies and sticking to the axe for woodcutting. Later, this can change.
The good news is that by punching beech saplings, you increase your Unarmed combat skill. While it’s probably not a good idea to take on one of the Forsaken bosses with just your bare hands, smaller threats can take their licks easily. Some of these smaller threats, like boars, will drop Raw Meat to be cooked later as well as crafting materials. You may also run into the first of Valheim’s more fanciful creatures, Greylings. These short and spindly humanoids are the weak version of Greydwarves (which you meet later) and they are a pain which can kill you if you’re not careful. But they drop Resin, which you use for crafting and fuel. The four recipes below are the only ones you can build without a workbench.
As you wander around, you’ll probably come across Raspberries, Blueberries, and Mushrooms. Gather these up and eat them to increase health and stamina. These are the only foods you can immediately eat without cooking. As mentioned before, you can pick up Raw Meat from killing boars, but it can’t be eaten until you get yourself a cooking station. The same goes for the demi-amphibian Necks, who drop Neck Tails which can be cooked as well.
- Club – 6 Wood
- Hammer – 3 Wood, 2 Stone
- Stone Axe – 5 Wood, 4 Stone
- Torch – 1 Wood, 1 Resin
Staking Your Claim

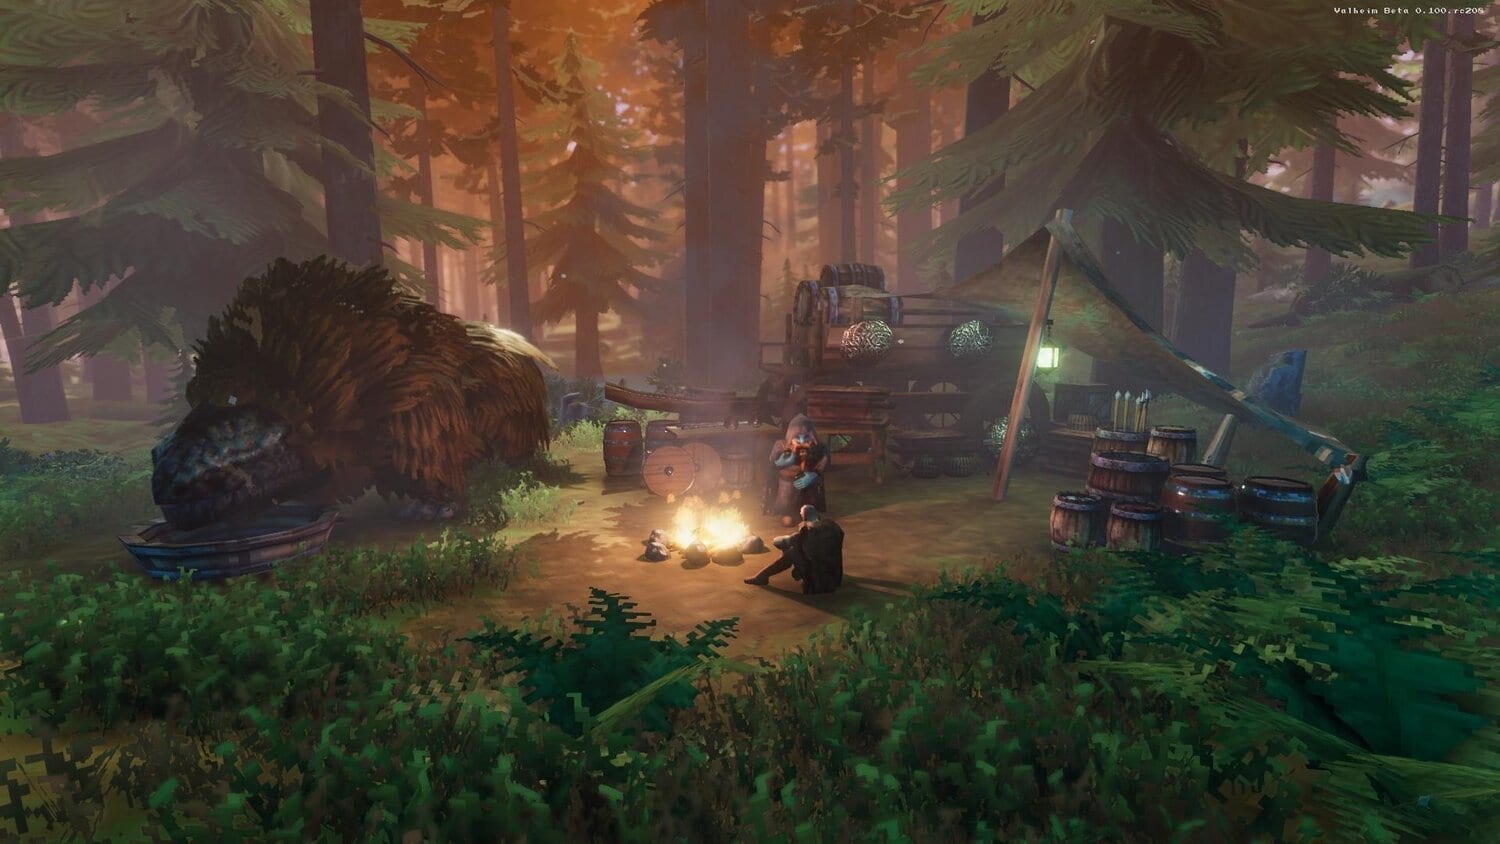
You start off in the morning, but you’re going to need shelter, since it gets cold at night (another status effect which dampens stamina regen). Also, you’ll notice as you’re bashing in skulls or cutting through logs that your gear slowly gets worn down. You’ll need to craft a workbench by equipping your hammer. Creating a workbench will unlock the ability to craft building components and other enhancements, along with a few other items, as well as repairing most of what you craft. However, the workbench itself needs to be inside shelter of some sort to make use of it.
Since every world is procedurally generated from a random seed, you may find existing structures of varying sizes and states of disrepair. Assuming you find one big enough for your own tastes, you can place a workbench in one, repair the structure, and either use that as a workshop or expand it into a larger structure to live in. Otherwise, if you can’t find one that suits your purposes for right now, try to find a reasonably level spot, use the hoe to smooth out what you can, and set up your first shelter.
One of the important things about the shelter, other than a roof over your head, is the campfire. It’s used primarily to heat the shelter, which in turn helps grant a “Rested” status effect that significantly improves health and stamina regen. It also rapidly eliminates the “Wet” status effect. However, you can’t just have a firepit in the middle of your house and expect to be OK. You have to create a chimney over the campfire and have it lead out of the structure. Some prefab structures have sections which can easily be adapted to form a chimney with a minimal amount of effort, but if you’re building from scratch, you can use the chimney as a sort of focal point for the roof of your shelter. Just enclose three sides at ground level, and four going up, leaving room at the top for smoke to escape.
Once the chimney is in place and you’re relatively safe from dying of smoke inhalation (yes, that can happen in Valheim; it’s not a pretty way to go), you can place a cooking station over the campfire to cook the Raw Meat and Neck Tails you’ve been picking up. When properly cooked, these meals will increase your health and stamina bars. You’ll want to build a bed, as well, as this creates a new spawn point should you suffer an untimely demise.
- Workbench – 10 Wood
- Hoe – 5 Wood, 2 Stone
- Campfire – 5 Stone, 2 Wood
- Cooking Station – 2 Wood
- Bed – 8 Wood
Survival Skills

Having established your base, you can now begin to explore the immediate area, listed on the minimap as “Meadows.” You’re likely to be encountering boars, Necks, and Greylings, so taking them out quickly is definitely to your benefit since they provide materials you need to keep going as well improve your various skills.
Speaking of skills, there are a few skills which are not immediately mentioned, but which are important for further progress. These are Run (defaulting to the left-hand Shift key on the keyboard), Jump (Space Bar), Stealth (left Control key), and Swimming. Of the four, Run and Jump should be practiced as much as possible, an old tip which players from The Elder Scrolls III: Morrowind will easily remember. Swimming should probably also be practiced, but you may want to set up a campfire close by. All you have to do is go into water deeper than your standing height and you’ll start swimming. It’s very stamina intensive, so maybe work on that one when you’re Rested. Stealth is probably the easiest to practice, since you only burn stamina when you move. As an added bonus, some weapons do extra damage when used in stealth, so it’s worth putting some effort in, even if you feel silly about it.
As you explore, you’ll inevitably come across streams and eventually coastlines. These are prime spots for a new crafting material, Flint. It’s worth it to pick up a couple of full stacks of Flint at this point, since there will be new crafting recipes which make use of it. The most important of these recipes is the Chopping Block, which levels up the workbench and unlocks the new recipes. Your first tool/weapon evolution comes in the form of the flint axe, a definite step up from the stone axe. You’ll also get all new weapons in the form of the flint spear, flint knife, and the crude bow, along with three different flavors of arrows. Best of all, if you picked up enough Flint and you’ve been gathering up other materials, you can upgrade your gear through the workbench’s Upgrade tab. You can also make shields to help protect you, but they require active use to block, so paying attention to the enemy’s timing is very important. Additionally, the bow uses a physics model for the arrows, so you have to aim higher than your target the further out they are. It takes some practice to know where to put the reticle, but once you’ve got it down, you’ll be potting animals and enemies before they ever know you’re there. You’ll likely start off with Wood Arrows since they require no Feathers for their construction. You can use them to hunt birds which drop Feathers on a successful kill.
While exploring, you may notice that you’ve reached a point where you can’t pick up anymore stuff automatically. If you pick up an item manually, it informs you that you’re Encumbered, a status effect which burns down stamina with every step and pretty much negates stamina regen, along with making you slower than molasses in January. You can’t destroy tools, weapons or materials. But you can store them away by crafting chests, which in turn lightens your load.
Finally, a note about cooking. There’s not any handy timer or anything which tells you it’s time to pull the meat off the fire. Rather, you want to watch for a visual effect, the fire flaring up, that tells you when the food’s ready. Leaving the food on too long will create a new material, Coal. Not terribly tasty, but potentially useful down the road.
- Chest – 10 Wood
- Chopping Block – 10 Wood, 10 Flint
- Crude Bow – 10 Wood, 8 Leather Scraps
- Flint Axe – 4 Wood, 6 Flint
- Flint Knife – 2 Wood, 4 Flint, 2 Leather Scraps
- Flint Spear – 5 Wood, 10 Flint, 2 Leather Scraps
- Wood Arrow – 8 Wood
- Flinthead Arrow – 8 Wood, 2 Flint, 2 Feathers
- Fire Arrow – 8 Wood, 8 Resin, 2 Feathers
- Wood Shield – 10 Wood, 4 Resin, 4 Leather Scraps
- Wood Tower Shield – 10 Wood, 6 Leather Scraps
This will certainly keep you occupied for the first few in-game days. Once you’ve been firmly established, you can look forward to the first of your Forsaken targets.